Disabling User Account Control (UAC) in Windows 7
There are many ways to disable UAC on your computer. Here are a few...
Option A - Disable UAC Through User Account Control Settings
This is the method that should be used by most users wanting to disable UAC.
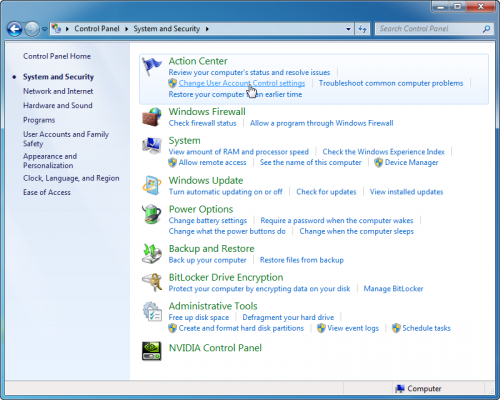
Go to User Account Control Settings.
Type in UAC, or go to the System and Security applet.
Click on the "Change User Account Control Settings" link.
 |
BTW, you can also type in this command from the Run menu:
C:\Windows\System32\UserAccountControlSettings.exe
To turn off UAC, move the slider to the Never notify position, and then click OK. If you're prompted for an administrator password or confirmation, type the password or provide confirmation.
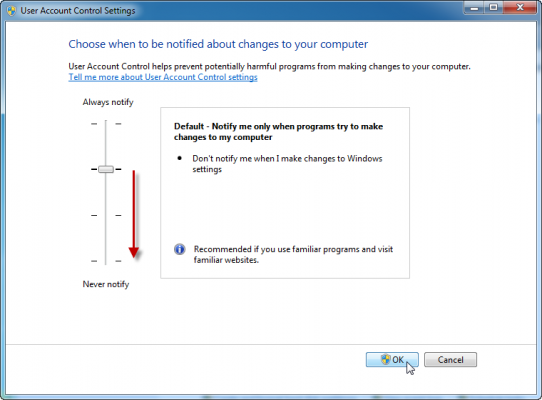 |
To turn UAC back on, move the slider to choose when you want to be notified, and then click OK. If you're prompted for an administrator password or confirmation, type the password or provide confirmation.
You will need to restart your computer for UAC to be turned off.
Option B - Disable UAC Through Group Policy
This is the method that should be used by administrators wanting to disable UAC across several computers at once.
This can be done via Local Group Policy or via Active Directory-based GPO, which is much more suited for large networks where one would like to disable UAC for many computers at once.
If using Local Group Policy you'll need to open the Group Policy Editor (Start > Run > gpedit.msc).
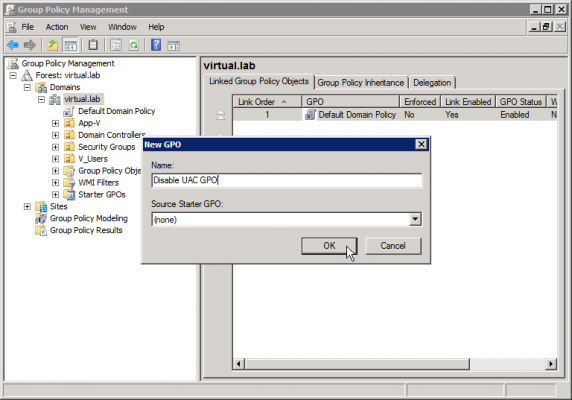
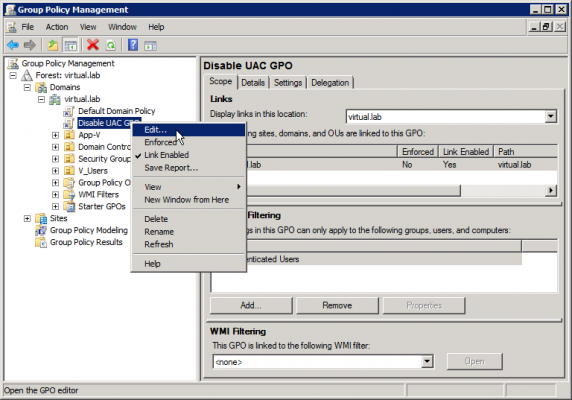
If using in AD-based GPO, open Group Policy Management Console (Start > Run > gpmc.msc) from a Windows Vista/7/2008 computer that is a member of the domain. In the GPMC window, browse to the required GPO that is linked to the OU or domain where the computers are located, then edit it, or, if needed, create a new GPO.

In the Group Policy Editor window, browse to Computer Configuration > Windows Settings > Security Settings > Local Policies > Security Options.
Make the following changes:
- User Account Control: Behavior of the elevation prompt for administrators in Admin Approval Mode - Set its value to Elevate without prompting.
- User Account Control: Detect application installations and prompt for elevation - Set its value to Disabled.
- User Account Control: Only elevate UIAccess applications that are installed in secure locations - Set its value to Disabled.
- User Account Control: Run all administrators in Admin Approval Mode - Set its value to Disabled.
- Disabled.

Restart the computer when done.
Option C - Disable UAC Through the Registry
Another method to disable UAC is through the computer's Registry.
Warning!
This document contains instructions for editing the registry. If you make any error while editing the registry, you can potentially cause Windows to fail or be unable to boot, requiring you to reinstall Windows. Edit the registry at your own risk. Always back up the registry before making any changes. If you do not feel comfortable editing the registry, do not attempt these instructions. Instead, seek the help of a trained computer specialist.
Click Start, click Run, type regedit, and then click Enter.
If prompted to enter your credentials by UAC, do so and/or press Yes to continue.
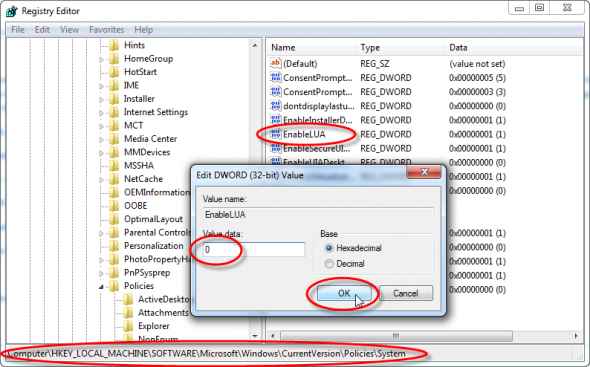
Navigate to the following registry subkey:
HKEY_LOCAL_MACHINE\SOFTWARE\Microsoft\Windows\CurrentVersion\Policies\System
In the details pane, locate the EnableLUA key (REG_DWORD type).
On the Edit menu, click Modify. In the Value data box, type 0 (zero), and then click OK.
Exit Registry Editor, and then reboot the computer.