OCS Inventory and Package Deployment Management Server
OCS Inventory NG, an OpenSource computer inventory and package deployment system for Win32 and Unix.
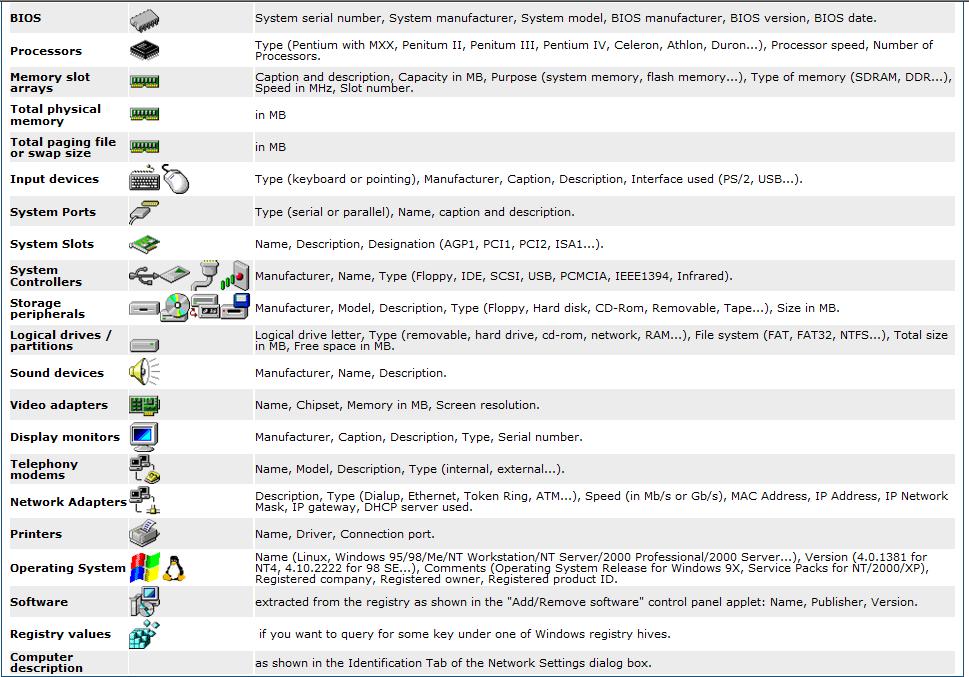
FEATURES
OCS Inventory NG, an OpenSource computer inventory and package deployment system for Win32 and Unix.
- Do you know all devices connected to your IT network?
- Do you know which software or hardware component is installed on a computer?
- Are you able to deploy softwares or configuration scripts on your computers?
 |
HOW TO INSTALL OCS INVENTORY NEXT GENERATION 1.3.2 (2010/05/13) FOR WINDOWS
You will need to download the following 3 items.
Download OCS Inventory NG Management server for Windows
OCSNG_WINDOWS_SERVER-1.3.2.zip
Download OCS Inventory NG agent for Windows
OCSNG WINDOWS AGENT 4061.1.zip
Download OCS Inventory NG Agent Deployment Tool
OCSNG_AGENT_DEPLOYEMENT_TOOL_1.02.zip
NB: This tool allows you to remotely install Windows Service Agent on a group of computers, using standard Windows administrative tasks, and to remotely install Unix Unified Agent on a group of computers using SSH.
OPTIONAL: You may like to download this PDF guide as well.
Under Windows Operating System
We have chosen to package OCS inventory NG server for Windows as an integrated package containing all required components. As is, the 3 main components of Management server (database server, web communication server and web administration server) are installed on the same computer.
OCS Inventory NG server 1.3.2 for Windows is based on ApacheFriends XAMPP version 1.7.3 (ApacheFriends) which sets the following components up on a single computer:
Apache 2.2.3
MySQL 5.0.27
PHP 5.2.0 + PHP 4.4.4 + PEAR
PHP-Switch win32 1.0
XAMPP Control Version 2.3 from www.nat32.com
XAMPP Security 1.0
SQLite 2.8.15
OpenSSL 0.9.8d
phpMyAdmin 2.9.1.1
ADOdb 4.93
Mercury Mail Transport System for Win32 and NetWare Systems v4.01b
FileZilla FTP Server 0.9.20
Webalizer 2.01-10
Zend Optimizer 3.0.2
eAccelerator 0.9.5 RC1 for PHP 5.1.6 (comment out in php.ini)
Perl 5.8.8
mod_perl 2.0.2
NOTE: Even if all these components are installed, you will be able to choose the components you want to automatically start.
LET’S BEGIN
Installing the management server
Warning: You must have Administrator privileges to set OCS Inventory NG server up under Windows NT4, Windows 2000, Windows XP or Windows Server 2003.
1. Download “OCSNG_WINDOWS_SERVER_1.3.2.zip”, unpack it and launch “OCSNG-Windows-Server-Setup.exe”.
2. Run the program
3. Choose your language
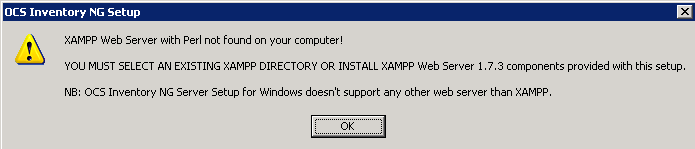 |
If XAMPP components (server and perl addon) are not already installed, Setup will prompt you that you have to set them up. Otherwise, Setup will automatically install OCS Inventory Server into XAMPP directories.
4. Click the OK button
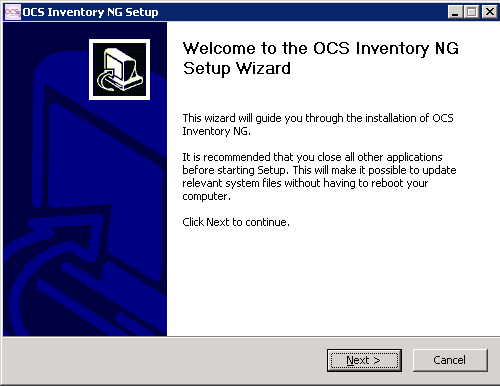 |
5. Click “Next” button to start installation wizard.
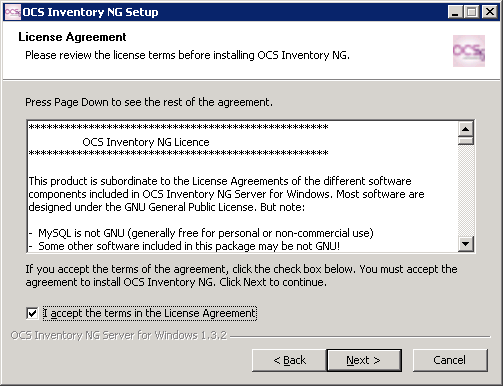 |
6. Check the "I accept the terms in the License agreement and Click “Next” button
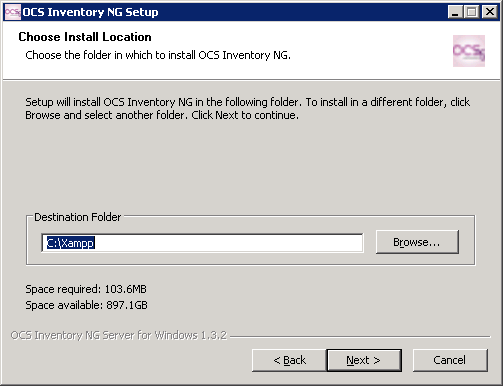 |
7. Choose installation directory, by default “C:\Xampp” is.
NOTE: You need approximately 400 MB of free hard disk space if XAMPP components are not installed; otherwise, only 10MB are required.
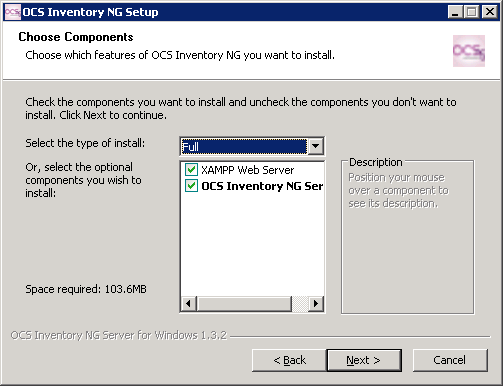 |
8. Make sure the both items are checked and FULL install is selected as well and click next
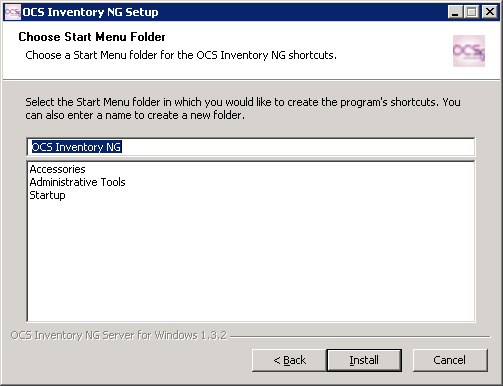 |
9. Start menu and icons will be installed under the default name OCS Inventory NG, click the Install button
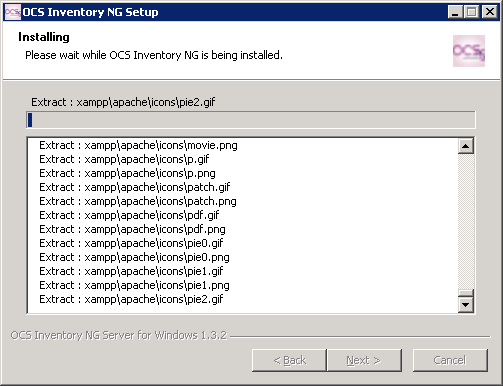 |
10. The program is now installing.
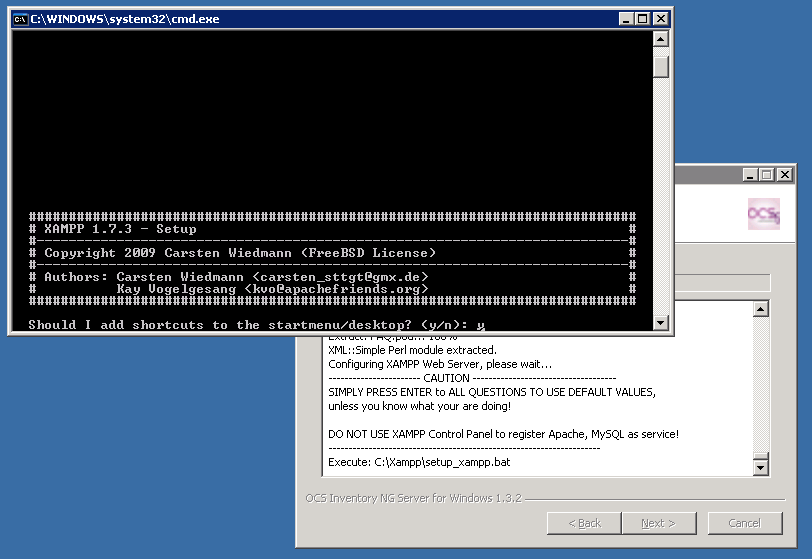 |
11. Press the Y button for yes and press the Enter button to install shortcuts
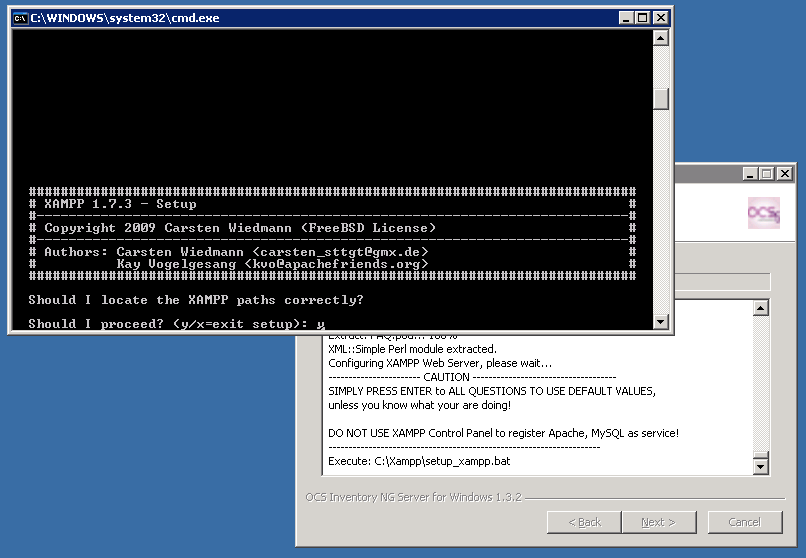 |
12. Make sure that y for yes is default and press the Enter button
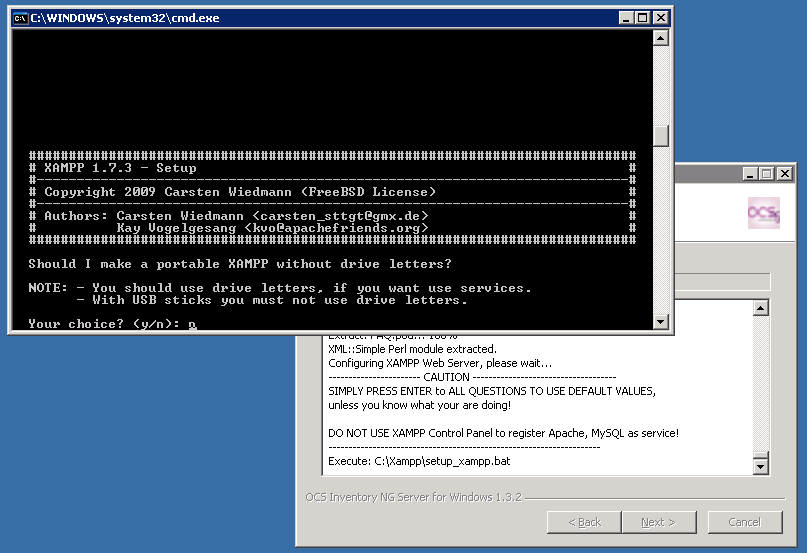 |
13. The default is n for no, do not change this, leave it n for no. We want to use drive letters so NO is what we want so XAMPP will use drive letters. Simply press the Enter button
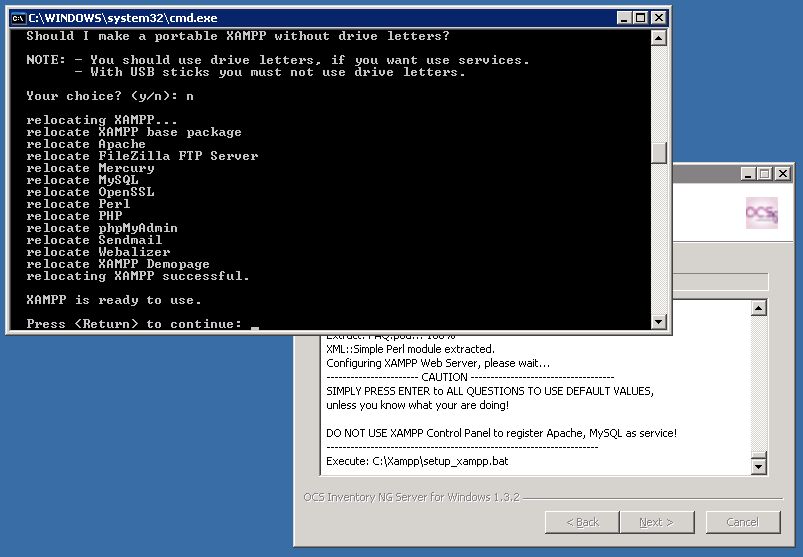 |
14. XAMPP is installed successfully; press the Enter button to continue.
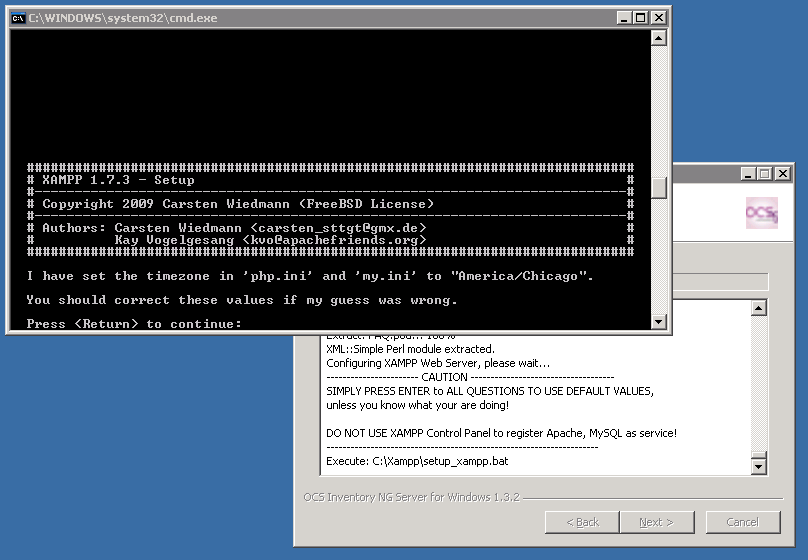 |
15. This screen is simply letting you know the current time zone setting and if it is wrong you may change it within the "php.ini" and "my.ini" files. Click the Enter button.
 |
16. The XAMPP setup screen is now displayed, simply type X, for Exit and press the Enter button as we are finished with this part.
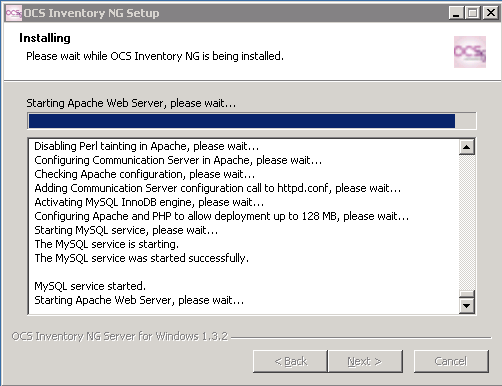 |
17. The setup continues on its own now.
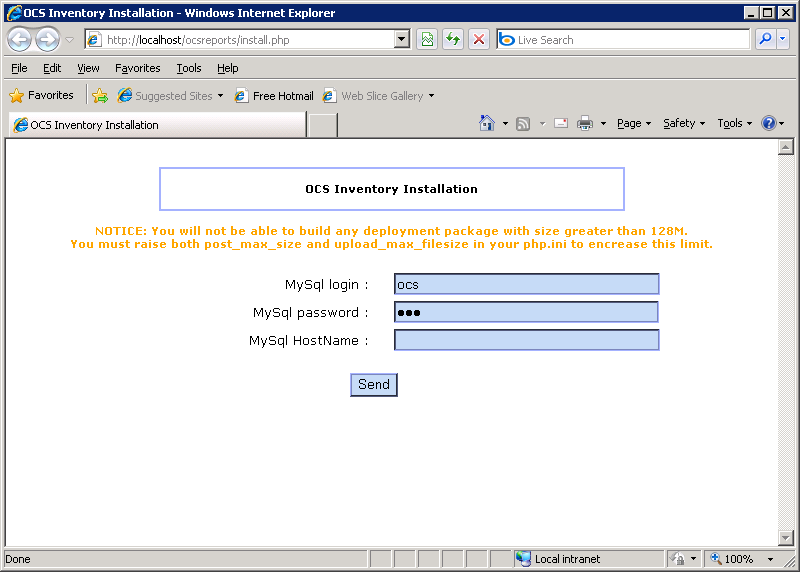 |
18. The OCS Inventory Installation webpage is displayed in your default browser.
You will be prompted for information to connect to MySQL database server with a user who has the ability to create database, tables, indexes, etc:
- MySQL user name, “root” by default
- MySQL user password (empty password by default)
- MySQL hostname, “localhost
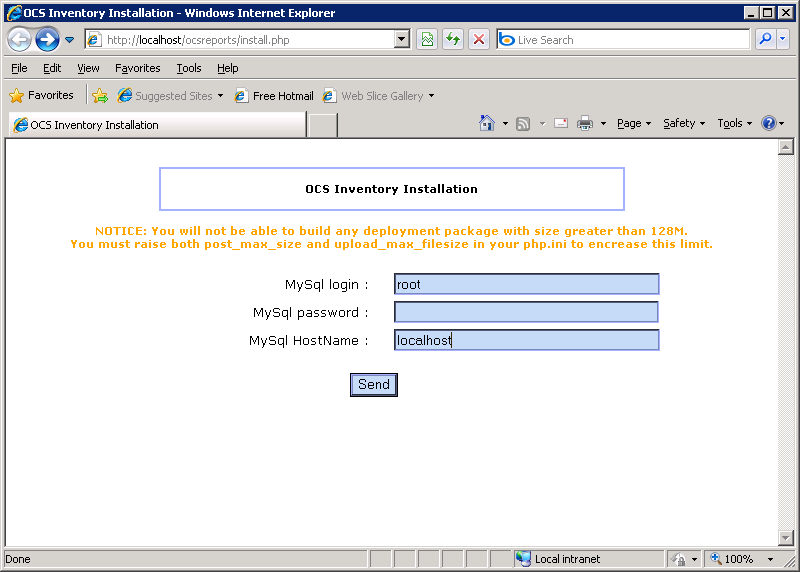 |
19. Fill in the information and click the Send button.
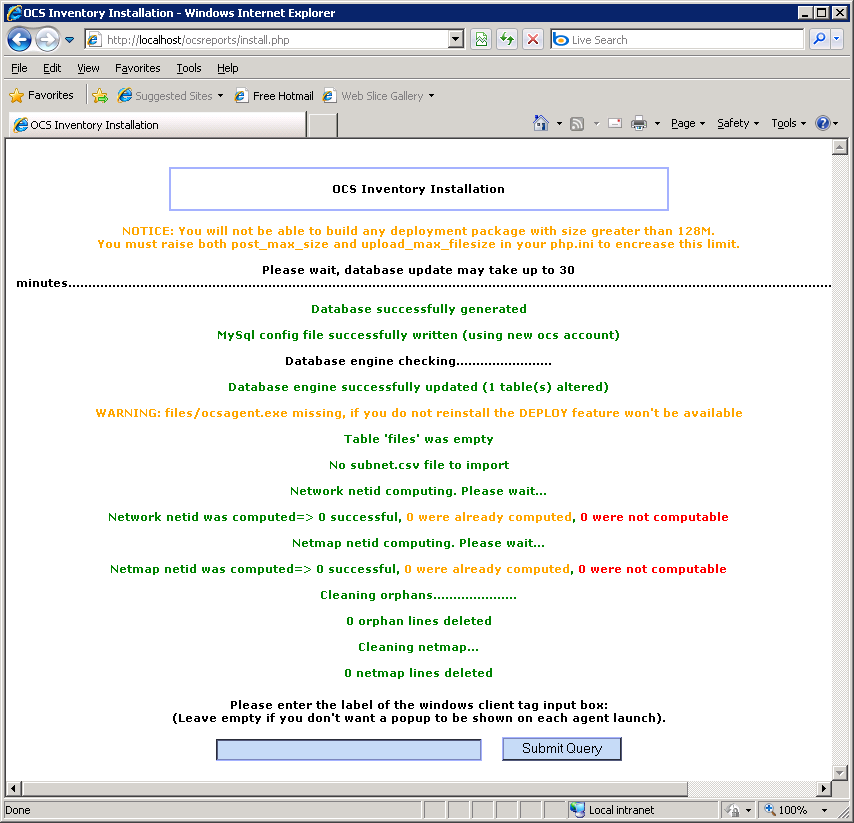 |
20. The above is an example of a successful creation of the database, since this is a first time install; it took only moments to install. As you can see, there is no data in the database as it is a clean install.
Additional Notes below:
Setup will create “ocsweb” database, and a MySQL user “ocs” with password “ocs”. It will also grant to user “ocs” privileges “Select | Insert | Update | Delete | Create | Drop | References | Index | Alter | Create temp | Lock” on database “ocsweb”. This user will be used by Administration server and Communication server to connect to the database. If you do not wish to use default MySQL user “ocs” with “ocs” password, you must update in the file “dbconfig.inc.php” PHP constants “COMPTE_BASE”, which is MySQL user login, and/or “PSWD_BASE”, which MySQL user password. Don’t forget to also update Communication server configuration, especially in apache configuration file.
The Submit Query button is for a TAG creation.
Finally, you may fill in a text describing the TAG, a string displayed at first launch of the agent to ask user to enter the TAG Value. It's a generic data which allows you to sort the new computers (geographical site, first floor, john room....). If you don't want this functionality, just let it blank.
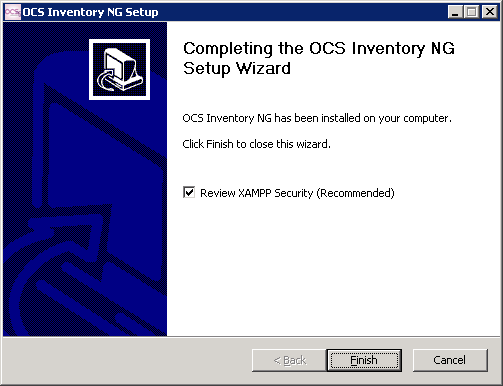 |
21. The above screenshot may be behind the database browser, it is asking if you would like to review the XAMPP security page, click the Finish button.
 |
22. The above screenshot is the XAMPP configuration page; click your language to begin.
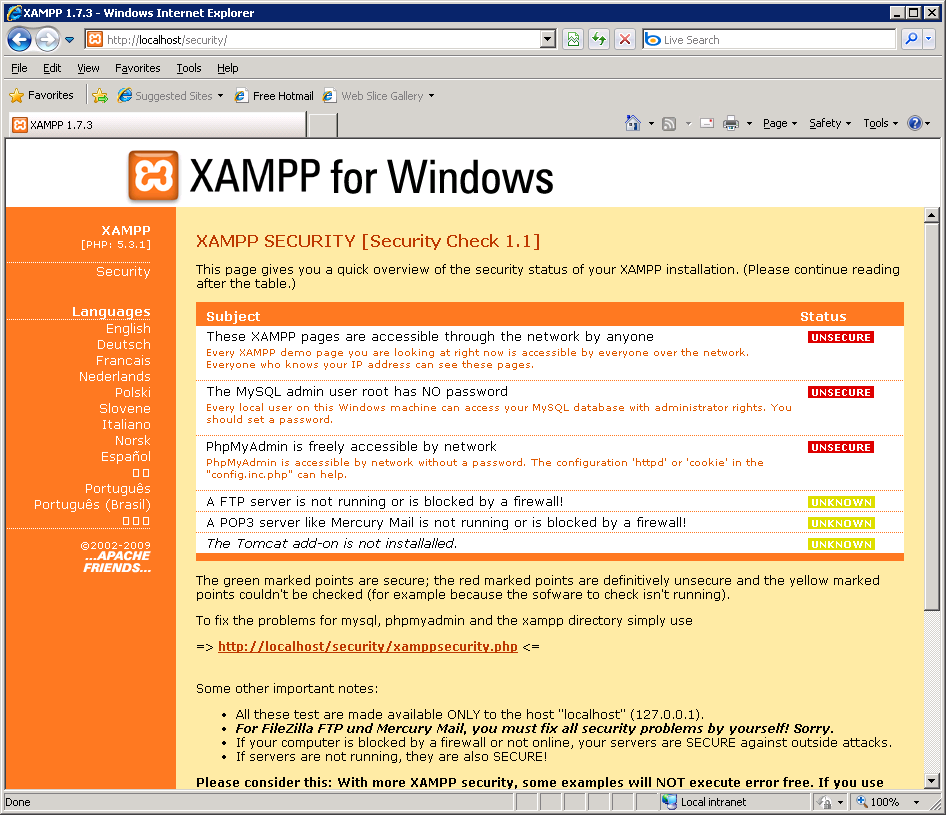 |
23. To fix the security settings, click the link provided "http://localhost/security/xamppsecurity.php", this is the same link that is in the page above.
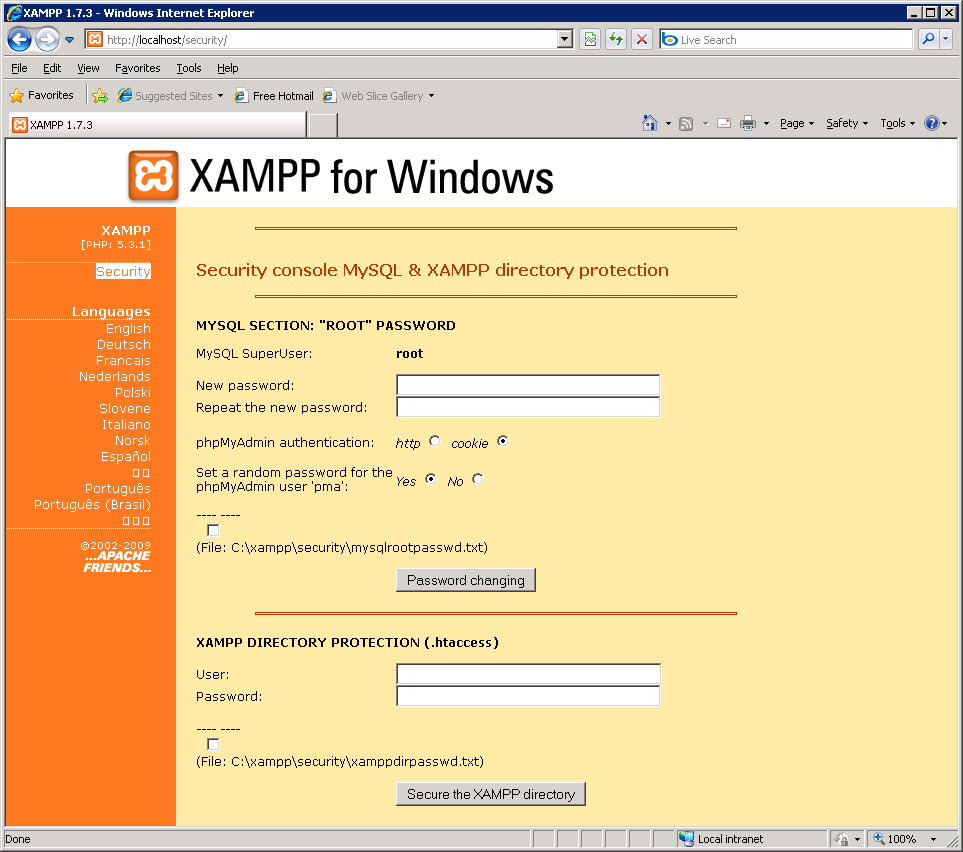 |
24. The above is the security page; you can make new passwords here.
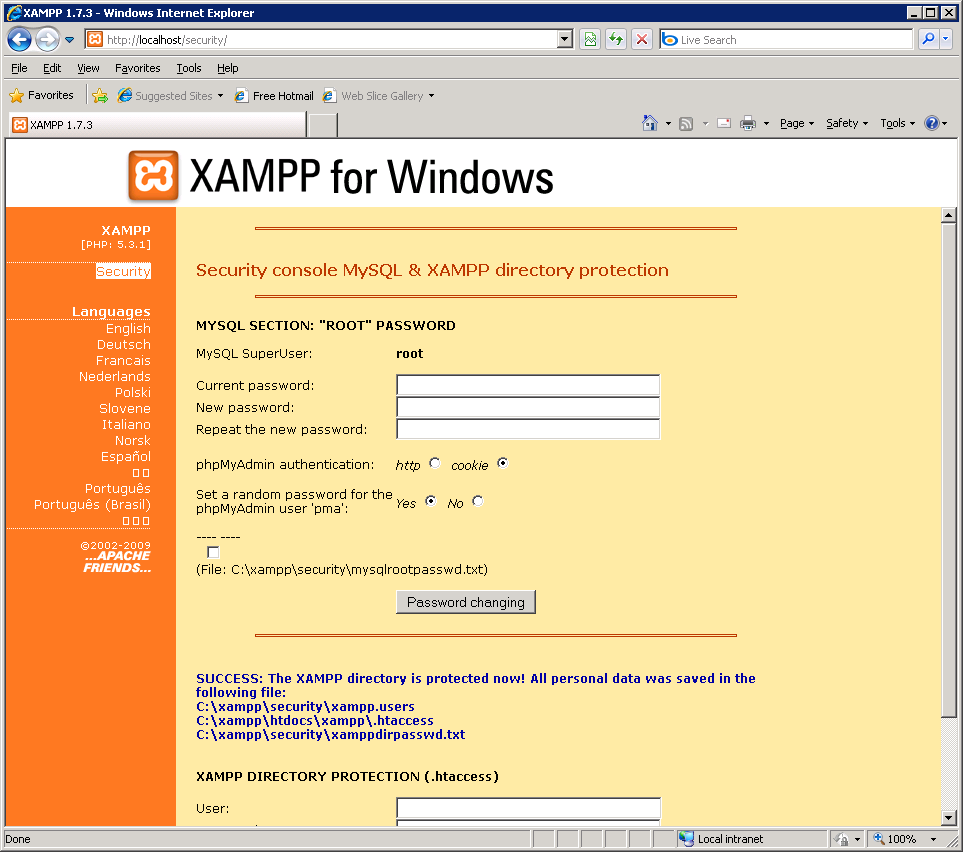 |
25. I changed both passwords and you should get the above message
NOTE: If you need to review the passwords you set or you forgot, look in the directories it points out, which are:
MySQL: File: C:\xampp\security\mysqlrootpasswd.txt)
XAMPP File Locations:
C:\xampp\security\xampp.users
C:\xampp\htdocs\xampp\.htaccess
C:\xampp\security\xamppdirpasswd.txt
26. You may now close the XMAPP page, we are finished with this.
NOW WE ARE READY TO LOOK AT THE OCS REPORTS INVENTORY PROGRAM
1. Open your favorite web browser on the server and point it on URL “http://localhost/ocsreports” to connect the Administration server.
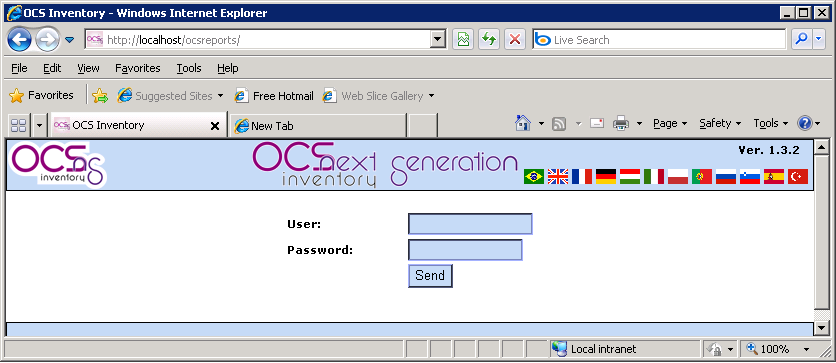 |
2. Default Administrator login is “admin” as user and “admin” as password.
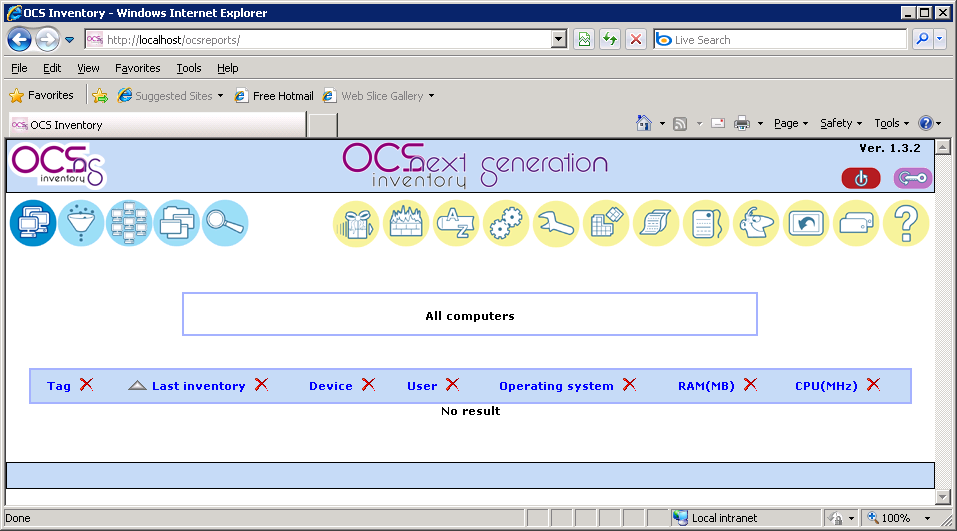 |
NOTE: The Inventory is EMPTY, this is normal on first time installation.
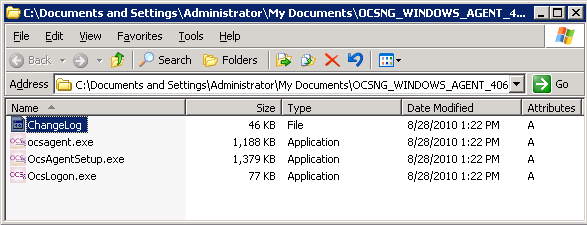 |
3. Unzip the OCSNG_WINDOWS_AGENT_4061.1.zip file and put the files wherever you want. We will need them later.
4. After you unzip the Windows Agent, you will have 4 files. Look at the screenshot above.
INSTALL THE OCSNG_AGENT_DEPLOYMENT_TOOL_1.02.zip
1. Unzip OCSNG_AGENT_DEPLOYMENT_TOOL_1.02.zip
2. This is the Deployment tool we will use to deploy the agents to install onto the computers on the network, this is a silent install, and no interaction from the user is required. The install is performed by the agent tool.
3. Click on the OCSNG_Agent_Deployment_Tool_Setup.exe file.
 |
4. The Agent Deployment Tool Setup Wizard, click the Next button.
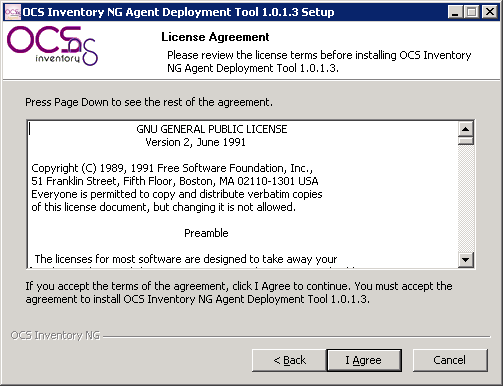 |
5. Click the I Agree button to accept the agreement.
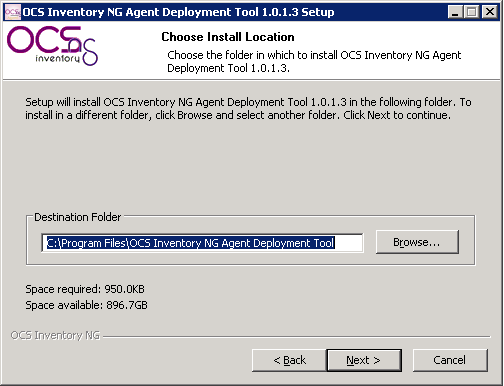 |
6. Leaving the default installation directory, click the Next button to continue.
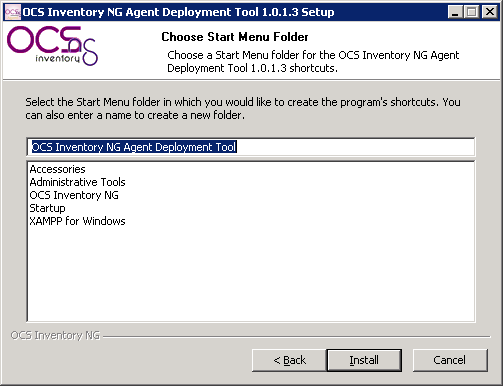 |
7. Click the Install button to begin the installation.
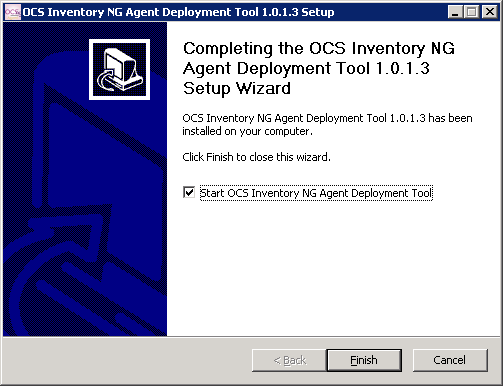 |
8. Installation is complete, click the Finish button to open the Agent Deployment Tool.
USING THE AGENT DEPLOYMENT TOOL
1. Open the OCS Inventory NG Agent Deployment Tool using the icon if one was created or go to it from the program files from the Windows Start button.
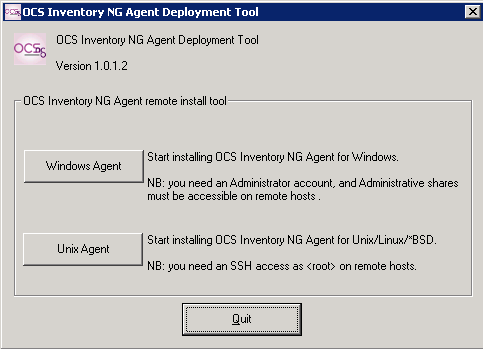 |
2. Click the Windows Agent button
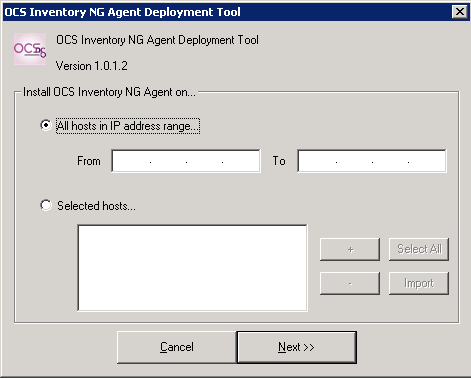 |
3. You presented with an empty IP range, fill in the IP range of computers that you would like the Agent install on.
 |
4. Above I have filled in the IP range of the computers on the network I would like to have the Agent installed onto. I am starting with 50 computers.
5. Click the Next button
 |
6. Now we need to point the Deployment tool to the Agent tool and server address.
7. Click the"..." button in the Agents service setup file, this is the browser button to find the Agent setup file.
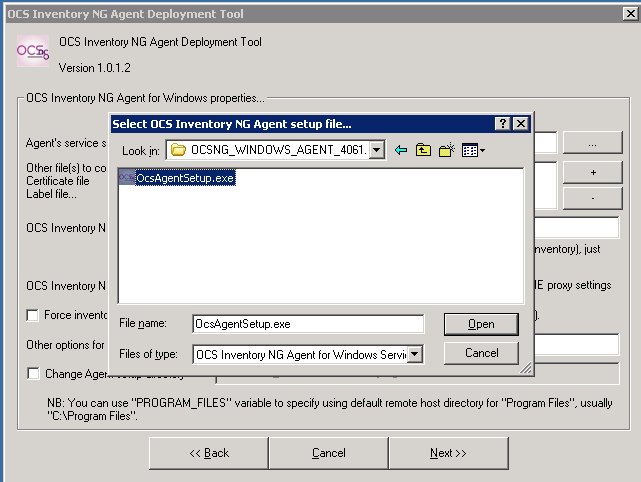 |
8. You are looking for the OcsAgentSetup.exe file, look at the example below. Browse and select this file. Once found, click the Open button.
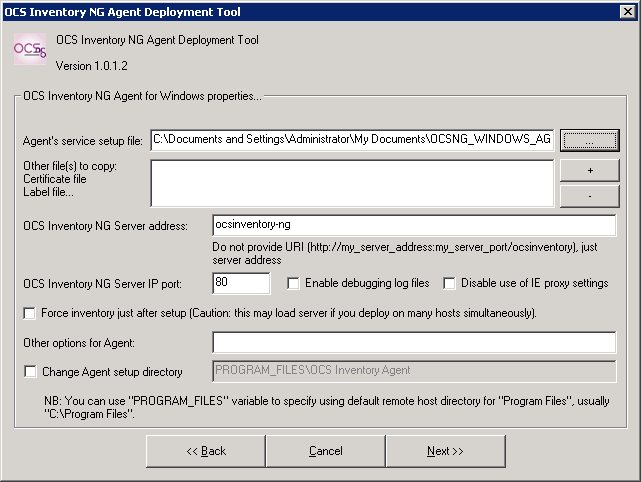 |
9. The Agent service files path is selected.
 |
10. Now we must fill in the OCS Inventory NG Server address.
11. It is best to put in the OCS Inventory servers IP address; this is where you installed the OCS Inventory program, see screenshot below. In my case the server is 192.168.2.250
NOTE: You may put a check mark in the "Force inventory just after setup" if you wish. If you DON'T check mark it, it can take some time before then server inventory’s the PC. It is normal for the server to be empty for a while until the inventory is displayed. Don't panic, it will inventory. Remember, you may check the Force option if you like to speed up the inventory process, but if you have many devices to inventory it could slow down your network.
12. Click the Next button
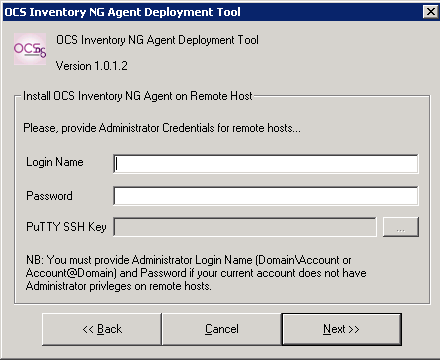 |
13. You must provide the Administrator login name and the administrator password for all the local machines, this is usually the same on a Domain network. For example, your Administrator login may be "administrator" and your password may be "nascar1988". Don't worry about the PuTTY SSH Key, we are not using it and is not necessary for this guide.
14. Click the Next button
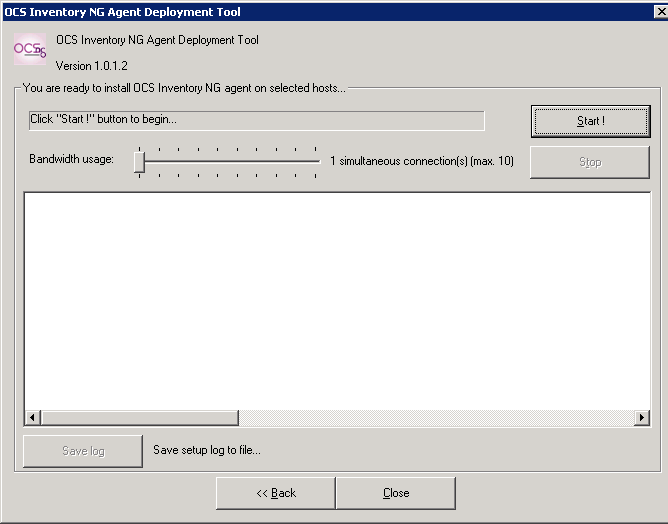 |
15. Observe the Bandwidth usage "slider" is set to 1 simulations connections, you may increase this value but be aware that more connections the harder the server has to work to gather information on the network. i personally don't go beyond 2 connections.
NOTE: You may get some errors in the agent deployment command, which is normal as there may not be a computer on at that IP address, computer is powered off, or the password and username may be different from the one you think it is. You will get an option to save all the IP addresses in an excel format when the program completes for review.
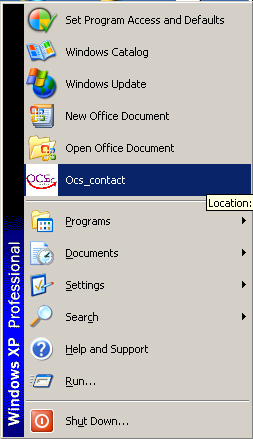 |
16. Above, an example of the Agent installed onto a client PC. When the agent is installed successfully on a PC, a new item will be listed in the programs menu. Here is where it typically is, just click the Start button and you should see the new item in the list as “Ocs_contact”. You now have a working agent on the pc. Remember, it may take a little time before the server inventory’s this pc. So you may see the new list item on the PC before you see its inventory in the OCS server.