Create a signature with a picture Windows Live mail
Create a signature with a picture Windows Live mail
INSTRUCTIONS
1.Start a new mail message (in the Mail window, press Ctrl-N). Ensure that the
Plain text button is showing, indicating that the message being composed is in
HTML.
2.Type a subject – this will become the file name for your signature file, so
something like JDE-signature might suit.
3.Type the text you want for your signature and format it as you wish – font
face, size, colour and alignment.
4.Click to set the insertion point where you want to place an image. On the
Insert tab, click Single photo. Navigate to the image file, which should
preferably have the extension .jpg, .png or .gif. It is best to have the image
already at the required size. The one at the right is 80 x 80 pixels. Firedog
avatar
5.If you want to add a hyperlink to the image, for example to the company’s
website, click on the image and press Ctrl-K. Enter the full URL into the box
(e.g. http://www.company.com/index.html) and press Enter.
6.Press F12 and save the message as HTML to, say, your documents folder.
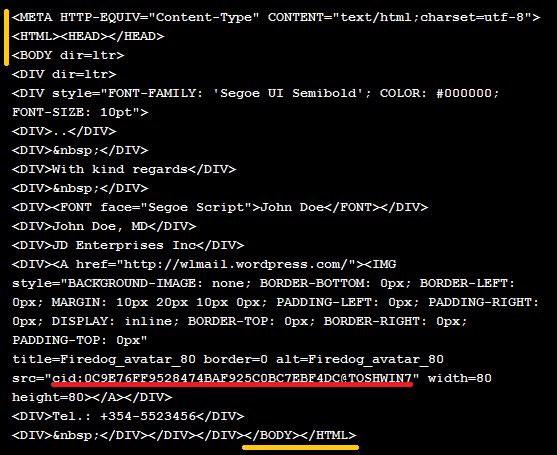
7.Open Explorer (Windows key + E) and navigate to the file you just saved.
Right-click on it and select Open with > Notepad. It should look something like
the picture.
The part after src= (underlined in pink) should be replaced by the complete path
to the image file.[1] An easy way to do this is to Shift-right-click on the file
in Explorer and select Copy as path. Then mark the underlined bit and Paste
(e.g. press Ctrl-V). Check the number of quotes: there should be one
double-quote before and one after the path, e.g.
src=”C:\Users\JD\Pictures\JDE-logo.jpg”
9.Save and close the file.
10.In WLMail, press Ctrl-Shift-O for Options. On the Signatures tab, click New,
select File and browse to the file you just saved.
11.Click Rename and give your new signature a meaningful name.
12.Use the other options on that tab, including under Advanced, to specify when
and how you want to use the signature. There are also relevant options on the
Advanced tab.
13.Test the new signature.
[1] There are two files involved in this procedure. One is the HTML file with
the file extension .htm that you’re editing. The other is the picture (image)
file that you want to include in the signature. Be sure to select the right one
at this stage. It should have the extension .png, .jpg or .gif.
SIMPLY FOLLOW THE SCREENSHOTS BELOW
 |